Surya Namaskar Yoga Images: Easy Steps to Follow

Surya Namaskar, or Sun Salutation, is a powerful yoga practice that combines 12 poses to enhance your physical and mental well-being. This ancient routine not only boosts your flexibility and strength but also brings a sense of peace and relaxation. By regularly practicing Surya Namaskar, you can experience improved posture, increased energy levels, and a reduction in stress and negative emotions. With the help of surya namaskar yoga images, you can easily follow along and master each pose. Embrace this holistic workout to keep your body fit and your mind calm.
Preparation
Ideal Time
Best time of day to perform Surya Namaskar.
Performing Surya Namaskar in the morning can set a positive tone for your day. Morning yoga boosts your energy and mental clarity, helping you tackle daily tasks with ease. It also enhances your mood and sharpens your mind, reducing anxiety and stress levels throughout the day. By practicing in the morning, you align your body with the natural rhythm of the sun, which can improve circulation and strengthen your immune system. So, roll out your mat early and greet the day with this invigorating practice.
Suitable Place
Choosing a quiet and comfortable space.
Finding the right spot for your yoga practice is crucial. Choose a quiet and comfortable space where you can focus without distractions. A serene environment helps you connect with your breath and movements, enhancing the benefits of Surya Namaskar. Whether it's a cozy corner in your home or a peaceful spot in your garden, ensure the area is free from clutter. A clean and calm space allows you to fully immerse yourself in the practice, promoting relaxation and mindfulness.
Appropriate Attire
Wearing comfortable clothing for flexibility.
Wearing the right attire can make a big difference in your yoga practice. Opt for comfortable clothing that allows you to move freely. Stretchy fabrics like cotton or spandex are ideal as they provide flexibility and breathability. Avoid tight or restrictive clothing that might hinder your movements. The goal is to feel at ease and unrestricted, so you can focus on perfecting each pose. With the right outfit, you'll feel more confident and comfortable as you flow through the Surya Namaskar sequence.
Step-by-Step Guide
Pose 1: Pranamasana (Prayer Pose)
Display the image of the pose.
Visual aids like surya namaskar yoga images can be incredibly helpful. They guide you in aligning your body correctly and understanding the posture better.
How to perform the pose.
To begin Pranamasana, stand tall with your feet together. Inhale deeply as you raise your arms sideways, keeping your shoulders relaxed. Expand your chest and exhale gently, bringing your palms together in front of your chest. This pose symbolizes gratitude and prepares you for the sequence ahead.
Benefits of the pose.
Pranamasana helps relax your nervous system and maintain overall body balance. It also aids in relieving stress and anxiety, keeping you calm and composed. By practicing this pose, you set a peaceful tone for the rest of your Surya Namaskar routine.
Pose 2: Hasta Uttanasana (Raised Arms Pose)
Display the image of the pose.
Refer to surya namaskar yoga images to visualize the correct alignment and posture for Hasta Uttanasana.
How to perform the pose.
From Pranamasana, inhale and lift your arms overhead. Stretch your body upward, arching your back slightly. Keep your biceps close to your ears and gaze towards your hands. This pose encourages a full-body stretch and opens up your chest.
Benefits of the pose.
Hasta Uttanasana enhances flexibility in your spine and shoulders. It also improves digestion and boosts your energy levels. By practicing this pose, you invigorate your body and mind, preparing for the next steps in the sequence.
Pose 3: Padahastasana (Hand to Foot Pose)
Display the image of the pose.
Using surya namaskar yoga images can help you achieve the correct form in Padahastasana, ensuring you get the most out of the pose.
How to perform the pose.
Exhale as you bend forward from the waist, keeping your spine straight. Try to touch your feet with your hands, bending your knees slightly if needed. Let your head hang naturally, relaxing your neck and shoulders.
Benefits of the pose.
Padahastasana stretches your hamstrings and calves, enhancing flexibility in your legs. It also stimulates your digestive organs and helps relieve stress. This pose encourages a sense of calm and focus, grounding you in the present moment.
Pose 4: Ashwa Sanchalanasana (Equestrian Pose)
Display the image of the pose.
Using surya namaskar yoga images can help you visualize the correct form for Ashwa Sanchalanasana. These images guide you in aligning your body properly, ensuring you perform the pose effectively.
How to perform the pose.
To get into Ashwa Sanchalanasana, start from Padahastasana. Inhale deeply and step your right leg back as far as possible. Bend your left knee, keeping it aligned with your ankle. Place your hands on either side of your left foot, and look forward. Your back should be straight, and your hips should be low. This pose opens up your hips and stretches your legs.
Benefits of the pose.
Ashwa Sanchalanasana strengthens your legs and improves flexibility in your hips. It also enhances balance and coordination. By practicing this pose, you increase your lung capacity and improve your focus, preparing you for the next steps in the sequence.
Pose 5: Dandasana (Stick Pose)
Display the image of the pose.
Refer to surya namaskar yoga images to see the proper alignment for Dandasana. These visuals help you understand the posture better and ensure you maintain the correct form.
How to perform the pose.
From Ashwa Sanchalanasana, exhale and bring your left leg back to meet your right leg. Your body should form a straight line from head to heels, similar to a plank position. Keep your arms straight and engage your core muscles. This pose builds strength in your arms and core.
Benefits of the pose.
Dandasana strengthens your arms, shoulders, and core muscles. It also improves posture and stability. Practicing this pose regularly enhances your endurance and prepares your body for more challenging poses.
Pose 6: Ashtanga Namaskara (Salute with Eight Parts)
Display the image of the pose.
Surya namaskar yoga images can be particularly helpful for Ashtanga Namaskara. They provide a clear visual guide to ensure you perform the pose correctly.
How to perform the pose.
Lower your knees, chest, and chin to the floor while keeping your hips elevated. Your toes, knees, chest, hands, and chin should touch the ground, forming eight points of contact. This pose requires coordination and control.
Benefits of the pose.
Ashtanga Namaskara strengthens your arms and chest. It also enhances flexibility in your spine and shoulders. By practicing this pose, you improve your coordination and prepare your body for the transition to the next pose.
Pose 7: Bhujangasana (Cobra Pose)
Display the image of the pose.
Visual aids, such as images, can be incredibly helpful when learning Bhujangasana. They provide a clear picture of how your body should align, ensuring you perform the pose correctly.
How to perform the pose.
To get into Bhujangasana, lie flat on your stomach with your legs extended and feet together. Place your palms on the floor beside your shoulders. Inhale deeply and gently lift your chest off the ground, using your back muscles. Keep your elbows slightly bent and your shoulders relaxed. Look straight ahead or slightly upward. This pose opens up your chest and strengthens your spine.
Benefits of the pose.
Bhujangasana stretches your chest, shoulders, and abdomen. It strengthens your spine and improves flexibility. Practicing this pose regularly can help alleviate stress and fatigue, leaving you feeling rejuvenated and energized.
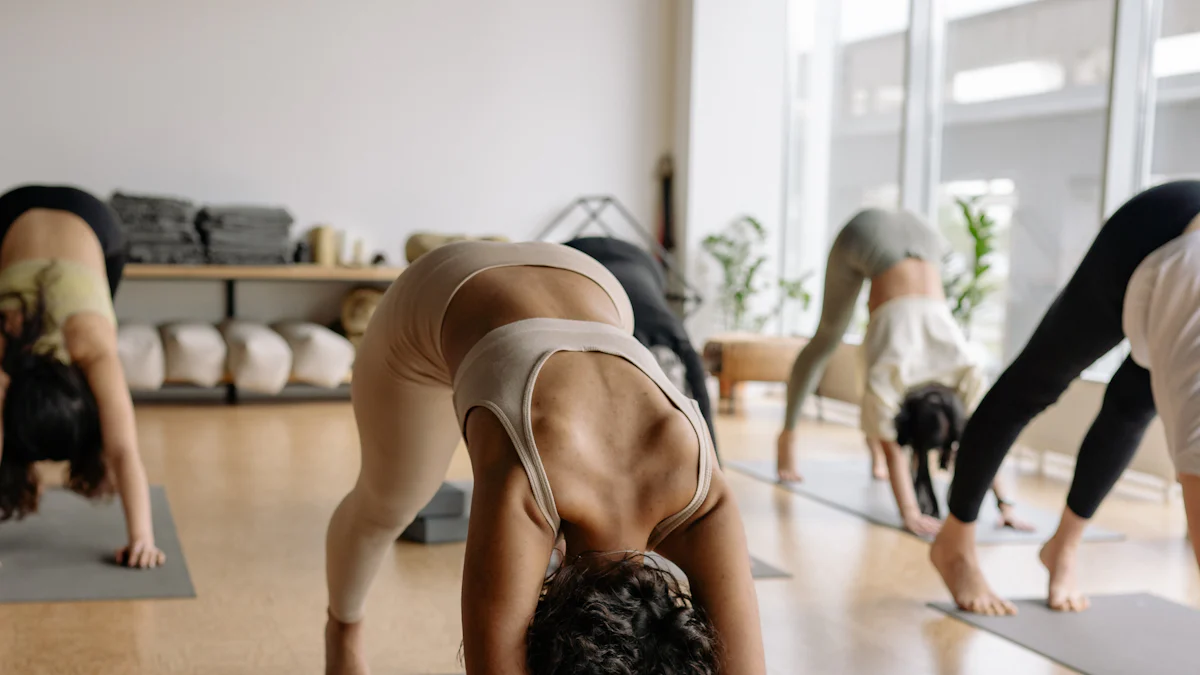
Pose 8: Adho Mukha Svanasana (Downward Dog Pose)
Display the image of the pose.
Images of Adho Mukha Svanasana can guide you in achieving the correct form. They help you understand the posture and ensure you maintain proper alignment.
How to perform the pose.
Start on your hands and knees. Spread your fingers wide and press firmly into the mat. Tuck your toes under and lift your hips towards the ceiling, forming an inverted V shape with your body. Keep your knees slightly bent if needed, and let your head hang naturally between your arms. This pose stretches your entire body and strengthens your arms and legs.
Benefits of the pose.
Adho Mukha Svanasana enhances flexibility in your hamstrings and calves. It also strengthens your arms and shoulders. This pose improves circulation and calms the mind, making it a great way to relieve stress and tension.
Pose 9: Ashwa Sanchalanasana (Equestrian Pose)
Display the image of the pose.
Refer to images of Ashwa Sanchalanasana to visualize the correct alignment. These visuals help you perform the pose effectively and maximize its benefits.
How to perform the pose.
From Adho Mukha Svanasana, step your right foot forward between your hands. Lower your left knee to the ground and look forward. Keep your right knee aligned with your ankle. Your back should be straight, and your hips should be low. This pose opens up your hips and stretches your legs.
Benefits of the pose.
Ashwa Sanchalanasana strengthens your legs and improves flexibility in your hips. It enhances balance and coordination. By practicing this pose, you increase your lung capacity and improve your focus, preparing you for the next steps in the sequence.
Pose 10: Padahastasana (Hand to Foot Pose)
Display the image of the pose.
Visual aids, like surya namaskar yoga images, can guide you in achieving the correct form for Padahastasana. These images help you understand the posture and ensure you maintain proper alignment.
How to perform the pose.
To perform Padahastasana, start by standing tall. Exhale as you bend forward from your hips, keeping your spine straight. Try to touch your feet with your hands. If needed, bend your knees slightly to avoid straining your back. Let your head hang naturally, relaxing your neck and shoulders. This pose encourages a deep stretch in your hamstrings and calves.
Benefits of the pose.
Padahastasana enhances flexibility in your legs and stimulates your digestive organs. It also helps relieve stress and tension, promoting a sense of calm and focus. By practicing this pose, you ground yourself in the present moment, improving your overall well-being.
Pose 11: Hasta Uttanasana (Raised Arms Pose)
Display the image of the pose.
Refer to surya namaskar yoga images to visualize the correct alignment for Hasta Uttanasana. These visuals guide you in performing the pose effectively.
How to perform the pose.
From Padahastasana, inhale and lift your arms overhead. Stretch your body upward, arching your back slightly. Keep your biceps close to your ears and gaze towards your hands. This pose encourages a full-body stretch and opens up your chest, enhancing your breathing capacity.
Benefits of the pose.
Hasta Uttanasana improves flexibility in your spine and shoulders. It also boosts your energy levels and aids digestion. By practicing this pose, you invigorate your body and mind, preparing for the final step in the sequence.
Pose 12: Tadasana (Mountain Pose)
Display the image of the pose.
Images of Tadasana can help you achieve the correct posture. They provide a clear picture of how your body should align, ensuring you perform the pose correctly.
How to perform the pose.
To perform Tadasana, stand tall with your feet together. Distribute your weight evenly on both feet. Keep your arms by your sides and relax your shoulders. Engage your core muscles and lengthen your spine. This pose serves as a grounding position, bringing balance and stability to your body.
Benefits of the pose.
Tadasana improves posture and strengthens your legs and core muscles. It also enhances your focus and concentration. By practicing this pose, you conclude the Surya Namaskar sequence with a sense of calm and centeredness, ready to embrace the day ahead.
Common Mistakes
Incorrect Alignment
How to correct alignment issues.
Alignment plays a crucial role in performing Surya Namaskar effectively. Incorrect alignment can lead to discomfort or even injury. To ensure proper alignment, focus on maintaining a straight spine and balanced posture in each pose. For example, in Chaturanga Dandasana, keep your body in a straight line from head to heels. Engage your core and align your shoulders with your wrists. This alignment not only enhances posture but also strengthens the connection between your shoulder blades and the back of your rib cage.
In poses like Hasta Padasana, concentrate on bending from your waist while keeping your spine straight. This helps balance your mind and improves digestion. Regularly check your form using a mirror or ask a yoga instructor for feedback. By paying attention to alignment, you maximize the benefits of each pose and reduce the risk of strain.
Breathing Mistakes
Importance of proper breathing.
Breathing is the foundation of yoga practice. Proper breathing enhances the flow of energy and helps you transition smoothly between poses. Many beginners tend to hold their breath or breathe shallowly, which can disrupt the rhythm of Surya Namaskar. Focus on deep, controlled breaths. Inhale deeply through your nose, filling your lungs completely, and exhale slowly, releasing tension.
Each pose in Surya Namaskar has a specific breathing pattern. For instance, inhale as you lift your arms in Hasta Uttanasana and exhale as you fold forward into Padahastasana. This rhythmic breathing calms your mind and keeps you present. Practicing mindful breathing not only improves your yoga experience but also enhances your overall well-being. Remember, your breath is your guide—let it lead you through each movement with grace and ease.
Tips for Beginners
Start Slow
Importance of gradual progression.
When you're new to Surya Namaskar, it's essential to take it slow. You might feel eager to master all the poses quickly, but remember that yoga is a journey, not a race. Starting slow allows your body to adapt to the movements and build strength gradually. Focus on learning each pose individually before attempting the entire sequence. This approach helps you understand the alignment and breathing techniques better.
"This Surya Namaskar asana (or pose) predominantly strengthens the entire spine, the abdomen, and the diaphragm. It tones the liver, spleen, and abdominal organs. It also helps improve the functioning of the heart, lungs, and thyroid gland. It is a great posture for beginners."
By progressing gradually, you give your body time to adjust, reducing the risk of injury. As you become more comfortable with the poses, you can increase the number of repetitions and explore deeper stretches. Remember, consistency is key. Regular practice, even if it's just a few minutes a day, will lead to noticeable improvements over time.
Listen to Your Body
Avoiding overexertion.
Listening to your body is crucial when practicing yoga. Each person's body is unique, and what works for one person might not work for another. Pay attention to how your body feels during each pose. If you experience pain or discomfort, ease off and modify the pose to suit your needs. Yoga should never be painful; it should feel like a gentle stretch.
Avoid pushing yourself too hard or comparing your progress to others. Overexertion can lead to fatigue or injury, which can hinder your practice. Instead, focus on your own journey and celebrate small victories along the way.
"Adho Mukha Svanasana, or downward-facing dog, is a calming and energizing Surya Namaskar pose that offers a host of benefits. This pose mainly helps to calm the nerves and increase blood circulation."
Incorporate poses like Adho Mukha Svanasana to calm your nerves and enhance blood circulation. These benefits contribute to a more enjoyable and sustainable practice. By listening to your body and respecting its limits, you'll cultivate a deeper connection with yourself and experience the true essence of yoga.
You've now explored the transformative power of Surya Namaskar. This sequence of poses not only enhances your physical strength but also nurtures your mental well-being. By incorporating Surya Namaskar into your daily routine, you can enjoy benefits like improved flexibility, reduced stress, and increased energy. Remember, consistency is key. Start your day with this practice to harness the sun's energy and set a positive tone. Use surya namaskar yoga images as a guide to perfect each pose. Embrace this holistic workout for a healthier, more balanced life.
See Also
Visual Guide for Practicing Surya Namaskar Effectively
Beginner's Guide to Practicing Yoga at Home
Yoga Asanas for Beginners: A Hindi Introduction

Hi my name is Lia and i am your host in this yoga journey in Portugal, Subscribe to our newsletter to receive every week the best of Yoga in Portugal.

We bring back the importance of initiation into womanhood by Roos-Veerle Krijnen & Ella-June Henrard
Welcome to the Women’s Initiation Retreat by Naked Truth Retreats, a transformative journey into the depths of your True Feminine Nature. This retreat invites you to remember the sacredness and wholeness of your being.
Roos-Veerle Krijnen & Ella-June Henrard